Today's options for doing development on Windows [1] in Dockerized projects:
- A virtual machine (ol' reliable)
- Cumbersome to setup, but it's the beaten path, and you have this guide!
- There are other hypervisors like VirtualBox or VMWare which have some advantages (easier networking - builtin NAT, port forwarding and so on) but performance and integration are I'd say the best in Hyper-V. Don't underestimate the importance of being able to shutdown your Windows and not worry about your VM being stopped without a clean shutdown.
- Docker Desktop (Hyper-V mode)
- Using bind volumes becomes problematic as Docker will automatically create Windows Shares for various directories, and those will be mounted as smb storage inside Docker's internal VM. Sometimes they break, and they lack support of advanced filesystem features and permissions aren't 1:1. You'll have lots of problems with tooling that expects a typical Linux filesystem.
- Docker Desktop (WSL2 mode)
- It can run better than Hyper-V mode but you have to follow certain complicated guidelines. If anything breaks you're left to debug a very complex technology stack.
- Performance won't be great if your project is stored in Windows (and have the same problems as with a Docker Desktop in Hyper-V mode). You'll have to move your project completely inside WSL. At that point you might as well just run a VM...
- Ubuntu Multipass (a Hyper-V VM management tool with cloud-init support)
- Easy to spin up lots of machines, preconfigured with cloud-init - useful for testing your Ansible playbooks for example.
- You can't configure the network switch, and lots of other Hyper-V settings are arbitrary - not really useful for general purpose development.
- Being able to use cloud-init is nice but you don't really need automation for something that you do once do you?
Ol' reliable *

The classical setup. The best performance and UI comes by running the apps (editors and tools) inside the VM and display them on the host desktop via a X11 server running in the host OS.
This requires the user to manually do configure these:
Network *
Hyper-V comes with a builtin NAT switch but it is severely lacking in the features area, notably it doesn't have port forwarding.
However Windows allows you to create your own NAT virtual network adapter. Run this in a powershell (press Start + X, Run powershell (Admin)):
# Delete previous adapter, if any
Get-NetNat | Remove-NetNat -Confirm:$false
Get-NetIPAddress -InterfaceAlias "vEthernet (NAT)" -ErrorAction SilentlyContinue | Remove-NetIPAddress -Confirm:$false

# Create a new Hyper-V switch which in turn creates an adapter that we need to configure
if (!(Get-VMSwitch -SwitchName "NAT" -ErrorAction SilentlyContinue)) {
  New-VMSwitch -SwitchName "NAT" -SwitchType Internal
}
Get-NetIPAddress -InterfaceAlias "vEthernet (NAT)" -ErrorAction SilentlyContinue | Remove-NetIPAddress -Confirm:$false
New-NetIPAddress -IPAddress 10.0.0.1 -PrefixLength 24 -InterfaceAlias "vEthernet (NAT)"
New-NetNAT -Name "NATNetwork" -InternalIPInterfaceAddressPrefix "10.0.0.0/24"
For port forwarding we have two options:
- NAT mappings (which unfortunately exposes your port on all interfaces)
- port proxies (which you can configure to only accept local connections)
If you want your VM to be accessible to other computers use NAT mappings, otherwise use port proxies. Performance is surely different but unlikely to matter for typical development.
To create NAT mappings (insecure):
Get-NetNatStaticMapping | Remove-NetNatStaticMapping -Confirm:$false
Add-NetNatStaticMapping -NatName "NATNetwork" -Protocol TCP -InternalIPAddress 10.0.0.10 -ExternalIPAddress 0.0.0.0 -ExternalPort 80 -InternalPort 80
The alternative, port proxies allow you to specify the listen address, for example this only allows local connections:
netsh interface portproxy add v4tov4 listenport=80 listenaddress=127.0.0.1 connectport=80 connectaddress=10.0.0.10
And finally you can test your port:
Get-NetTCPConnection -State Listen -LocalPort 80
Test-NetConnection -ComputerName 127.0.0.1 -Port 80
Virtual Machine *
You want to use something that runs the Hyper-V kernel modules for correct shutdown handling - Ubuntu or Fedora are tested to work correctly.
Ubuntu has an installation wizard:
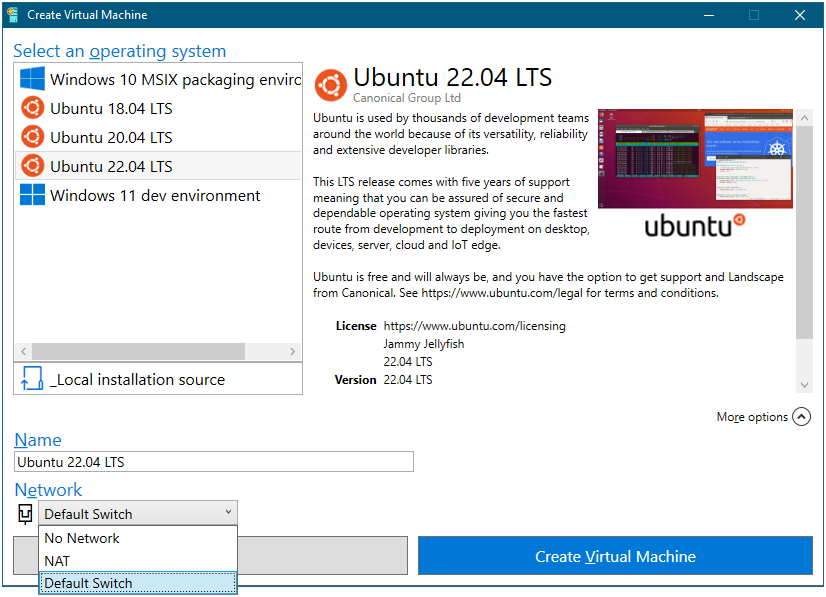
Does too many wrong things.
You should download and install a Server ISO instead. Ubuntu or Fedora.
While this wizard gets your VM quickly setup is has some disadvantages:
- It creates a dynamic expanding disk by default, something that you might find messy when you'll want to copy the VM to a different machine. Static allocations should be used to get the most predictable results anyway.
- It automatically installs a Desktop Ubuntu, something that you shouldn't use, and wont need to if you follow this guide.
If you insist with the wizard at least give the VM a single word name to avoid quoting in scripts and whatnot.
Recommended install process *
The best way is not always the quickest or easiest:
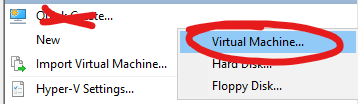
This is the way.
Recommendations:
- Don't put spaces or weird stuff in the name.
- Use Generation 2.
- Disable Dynamic Memory if you don't really need it.
- Allocate at least 8GB memory. The more the better - you don't want your programs to run off swap.
- Pick the "NAT" switch created before.
- Pick the ISO you have downloaded in "Installation Options". The VM will boot from the ISO.
Additional VM settings that you should do after creation:
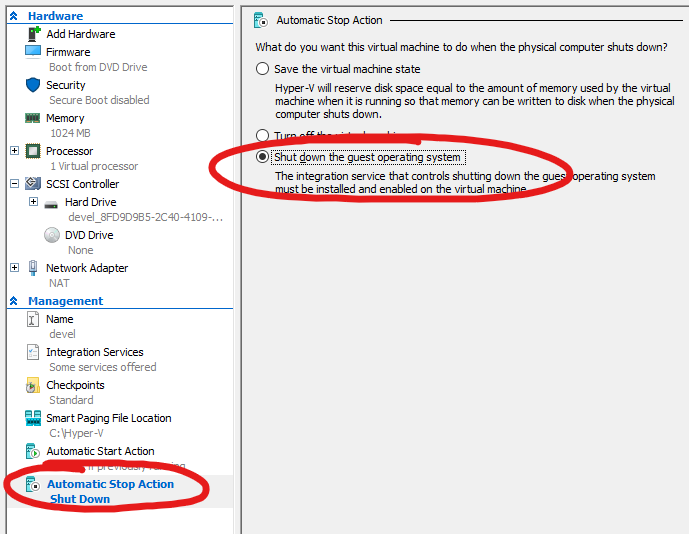
Shutdown guest on host shutdown - avoids disk trashing at shutdown, especially if you allocate a lot of memory to your VM.
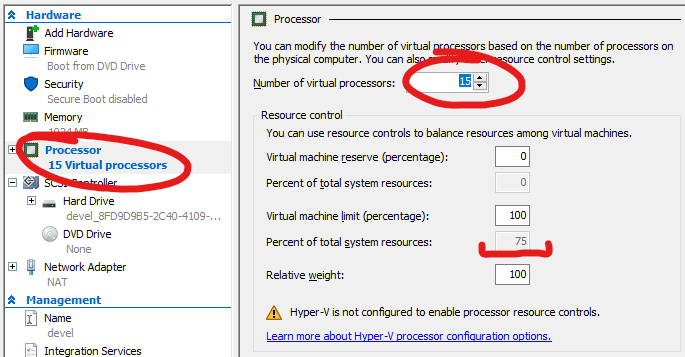
Don't allocate all the cores. Don't allocate just a couple cores either. Aim for 70-80% of your total system resources.
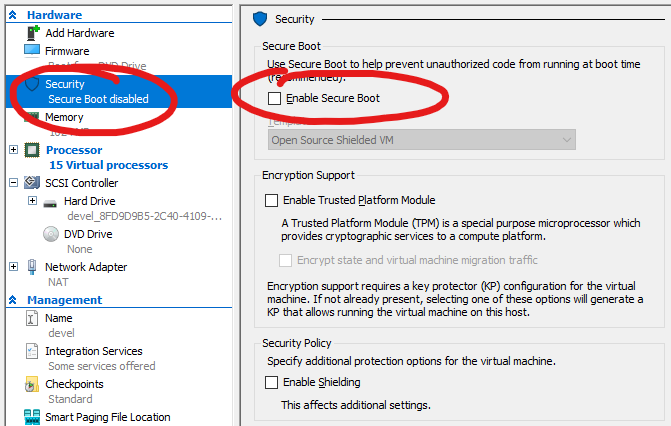
You don't need or want this fancy "security" feature.
Networking problems *
You'll notice in the installer that DHCP fails to get an IP, that's because that NAT switch created earlier doesn't have DHCP support at all. This is why this setup is not exactly easy to get into. But once you iron out all the kinks believe me this is the best.

Since you won't be creating VMs all day long this is fine. One time ordeal.
Storage layout *
You don't need fancy LVM. If you ever need to resize your storage it's simpler to just boot from a GParted ISO and resize a non-LVM partition.
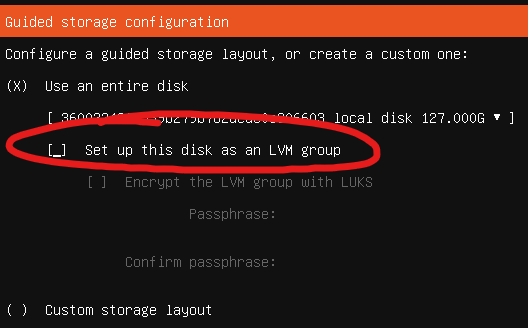
Avoid LVM. You don't need this abstraction.
LVM can do software RAID or encryption, features that you don't need or are best left to the host OS.
SSH access *
Note that you can and should install the OpenSSH service right from the setup interface.
You can also import your ssh identity from GitHub. You should setup your VM with ssh identity access for security and convenience anyway. Passwords are a thing of the past.
You can load your .ppk key in Pagent at login by making a shortcut to it in shell:startup (to open it either run that via Start + R or as a File Explorer address).
Ubuntu notes *
You don't really need any of the suggested Snap packages, not even docker. You always want the latest officially supported version, and that you can get from: https://docs.docker.com/engine/install/ubuntu/
SSH client *
The simplest way is to install Putty.
You won't be using the X11 forwarding feature from Putty. Other settings that you can try, depending on your preferred shell mileage may vary:
- putty-256color for Terminal-type string (alternative: xterm)
- ESC[n~ mode for Home and End keys
You might need to try a bunch of different settings for the best special keys handling, all dependant on shell.
Bash is the default shell. If you want to experiment you can try zsh (ohmyzsh is a popular way to customize your shell while antigen is the place to go when you want more than just a theme). You should only start tweaking your shell after you got everything else working though!
If you're new to Linux you should go over this cheatsheet.
Docker *
When getting Docker installed avoid the Docker packages provided by the linux distro or snap. Always use the official one from docker.com, e.g.: https://docs.docker.com/engine/install/ubuntu/
Don't forget to also read https://docs.docker.com/engine/install/linux-postinstall/ as you won't be using the root user for development, and your user needs some extra privileges to access the Docker daemon without sudo.
Desktop support *
This setup avoids running a full blown desktop inside the VM for performance and better integration with the Windows desktop. Thus you need to run a X11 server on the host OS (Windows).
There are two options for X11 servers:
VSOCKS are direct communication channels between host machine and guest. You can use it to forward the X11 server on the host to the guest without Putty (and skip all the reliability issues that entails).
To put it differently: VSOCKS are the way to go. Even WSLg is using them.
Prereuisites *
First the apps running in the guest must be able to connect through these sockets so we must create a proxy and setup X11 env vars.
Inside the VM *
Create /etc/systemd/system/x11vsock.service:
[Unit]
Description=X410 VSOCK Service
After=network.target

[Service]
User=root
Restart=always
Type=simple
ExecStart=/usr/bin/socat -b65536 UNIX-LISTEN:/tmp/.X11-unix/X0,fork,mode=777 SOCKET-CONNECT:40:0:x0000x70170000x02000000x00000000

[Install]
WantedBy=multi-user.target
Install socat if you don't have it already:
sudo apt-get install socat
Then enable the service:
sudo systemctl enable x11vsock.service
sudo systemctl start x11vsock.service
Make sure you check if it's actually running:
sudo systemctl status x11vsock.service
Patch your environment to have correct X11 settings by creating /etc/profile.d/x11vsock.sh:
if [[ ! $DISPLAY && -S "/tmp/.X11-unix/X0" ]]; then
    export DISPLAY=:0.0
fi
You should also test that these environment variables appear in your environment after logging in again. Try this in your shell to test:
env | grep DISPLAY
If it not there then you might need to consider a different file to place these environment variables, e.g.:
- ~/.profile
- ~/.bashrc
- ~/.zshrc
- /etc/profile
Outside the VM (in the host) *
On the host you need to do an obscure registry setting. Create a x11.reg file and then run it:
Windows Registry Editor Version 5.00

[HKEY_LOCAL_MACHINE\SOFTWARE\Microsoft\Windows NT\CurrentVersion\Virtualization\GuestCommunicationServices\00001770-facb-11e6-bd58-64006a7986d3]
"ElementName"="X11 Display 0"
You can read more about it here.
X410 *
X410 is pretty simple to setup but it's paid solution. One time, no subscriptions or anything weird.

That's all to it!
VcXsrv *
VcXsrv is free X11 distribution for Windows. Don't waste your time with Xming, it's advertised as free but you have to pay and wait a least a working day to get the latest version.
First you need to create a config.xlaunch file somewhere:
<?xml version="1.0" encoding="UTF-8"?>
<XLaunch
  WindowMode="MultiWindow"
  ClientMode="NoClient"
  LocalClient="False"
  Display="-1"
  LocalProgram="xcalc"
  RemoteProgram="xterm"
  RemotePassword=""
  PrivateKey=""
  RemoteHost=""
  RemoteUser=""
  XDMCPHost=""
  XDMCPBroadcast="False"
  XDMCPIndirect="False"
  Clipboard="True"
  ClipboardPrimary="False"
  ExtraParams="-vmid {00000000-0000-0000-0000-000000000000} -vsockport 6000"
  Wgl="True"
  DisableAC="False"
  XDMCPTerminate="False"
/>
Now you only need to load this configuration at login by making a shortcut to it in shell:startup (to open it either run that via Start + R or as a File Explorer address).
Testing *
Before spinning up your favourite IDE it's best to test the X11 connection with something really simple that is easy to debug.
Install and run xclock:
sudo apt-get install xclock
xclock
An ugly analog clock application should appear in your taskbar if everything is working properly.
If you get an error then you need to make sure the x11vsock service you created earlier is running, that you have the right DISPLAY environment var is set and that your X11 server is actually running with Hyper-V VSOCK support enabled.
File access *
Last but not least you might want some file access from Windows inside your VM. Of all the possible solutions the least worst solution is via SSH - use SFTP Drive.
| [1] | Ionel, are you crazy? Why are you using Windows? Windows is bad, expensive and big bad Micro$oft is spying on you! Yes. Games and apps. Yes but you can fix it. Micro$oft can't stop you from buying a $10 second-hand OEM license either. |